Introduction
Containers have recently become a very popular delivery mechanism for software applications. This is in part due to the popularity of the microservices software architecture pattern, which encourages delivering applications as a set of discrete, independent, loosely-coupled services. A microservice is an ideal payload for the container abstraction. Perhaps, the biggest influence, however, has been the Moby project, which has literally rendered the container abstraction, a commodity.
Working with containers on a single Docker host for development purposes is a relatively straightforward experience. However, what happens when we want to deploy our application into a production environment? We need resilience, the ability to scale our services, and to update them ‘in flight’, amongst other things. This is difficult to achieve on a single Docker host, and has given rise to the notion of container orchestration.
This is the first tutorial in our series that unravels some of the concepts and features associated with container orchestration. It focuses on the Docker project’s native orchestration capability, provided through the open source toolkit, Swarmkit.
In this first article, we’ll explore how to bootstrap a Swarm cluster on AWS, using the Docker Machine provisioning tool. We’ll discuss some cluster concepts, and differentiate between different node roles, before deploying and scaling a simple service across the cluster.
Prerequisites
In order to follow the tutorial, the following items are required:
- an AWS account
- aws-cli (if not using the aws-cli Docker image)
- Linux: Docker Machine 0.10.0, Docker 1.13.0+
- Windows: Docker for Windows 17.0.3.0-CE+
- macOS: Docker for Mac 17.0.3.0-CE+
Clusters
In order to provide a suitable environment for running containers at scale, we require an orchestration platform, or cluster, to host the containers. There are several options available from the open source community, but this series of articles will focus on the Docker project’s native orchestration capability, Swarm.
Swarm, just like the other peer orchestration tools, requires a cluster of compute nodes in order to function. In the case of Swarm, these nodes all run the Docker Engine, and co-operate together as a tightly-coupled unit, for deploying containerized workloads.
The nodes in the cluster, will be delegated a role — a manager or a worker. Manager nodes take part in the management of the cluster, maintaining its state and scheduling container workloads, whilst the workers are recipients of the container workloads. Unless directed otherwise, a manager will also perform the worker role, and will host container workloads as well perform management functions.
Initiating a Swarm
In order to demonstrate how to establish a Swarm cluster, we need a Docker host. We can establish a Docker host in the cloud, and this tutorial uses Amazon Web Services (AWS). There are numerous ways to do this, but for simplicity’s sake, we’re going to use Docker Machine. Docker Machine is a command line tool for creating remote Docker hosts. A pre-built binary can be downloaded from the project’s GitHub repository, where there are further instructions for installing the binary.
To create a Docker host, we need to run the docker-machine create command, specifying the amazonec2 driver, an appropriate AWS region for the instance, and a name for the Docker host – node-01 in this case:
$ docker-machine create --driver amazonec2 --amazonec2-region eu-west-2 node-01
Docker Machine is smart enough to retrieve the AWS credentials from their default location in your home directory (or they can be provided as command line options, or set as environment variables), and can take a number of different configuration options to nuance the creation of the instance on AWS.
Once node-01 has been created, and assuming we have a local Docker client installed, we can point our Docker client at the remote Docker host and test communication with the following commands:
$ eval $(docker-machine env node-01)
$ docker system info --format '{{.Name}}'
node-01
The first command sets some environment variables necessary for the local Docker client to find the remote Docker host, and to configure TLS-encrypted communication, whilst the second queries the remote Docker daemon for the host’s name.
All that is required to establish a Swarm cluster, is in-built into the Docker daemon running on the remote Docker host. Unlike other orchestration tools, Docker’s native orchestration capability does not rely on any external dependencies. Hence, in order to initiate ‘Swarm Mode’, it only requires the execution of a simple Docker CLI command:
$ docker swarm init
Swarm initialized: current node (doow8fsw5aoxy2a39l47nztln) is now a manager.

To add a worker to this swarm, run the following command:

    docker swarm join \
    --token SWMTKN-1-5rgvodnnugqbfiuzhvcpnb30x58zwo6oh3oefd8tbcb40lp1o7-df8tr59zzv4ocyumb31m3fezt \
    172.31.13.238:2377

To add a manager to this swarm, run 'docker swarm join-token manager' and follow the instructions.
We now have a Swarm cluster, with a single manager node – that’s all it takes.
Cluster State
Maintaining the state of the cluster is crucial to its ongoing operation. If the state of the cluster is compromised, whilst existing containers will continue to run, management of the cluster (including the scheduling of new containers) will not be possible.
For this reason, orchestration tools, including Swarm, make use of the Raft Consensus algorithm in order to maintain cluster state. For the interested reader, Raft Consensus is explained in more detail here.
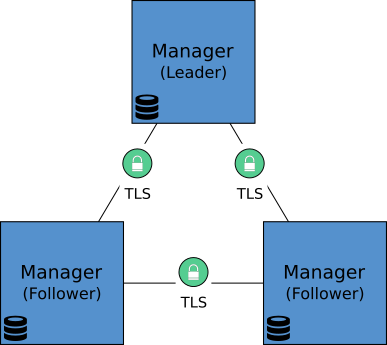
In practical terms, our cluster requires multiple manager nodes to ensure the maintenance of the cluster state. If we deploy n manager nodes, the cluster requires a quorum of n/2+1 manager nodes, and can tolerate (n-1)/2 manager node failures. Typically, an odd number of manager nodes should be deployed, but too many will encumber the cluster in continually maintaining state. Three, five or seven is considered best practice, dependent on attitude to risk. Each manager node in the cluster maintains its own copy of the Raft log, which represents the cluster state, and in so doing, enables it to assume the leadership role, if required.
When a Swarm cluster is initiated and additional managers are added to the cluster, Docker establishes secure, mutual-TLS encrypted connections between the manager nodes. The diagram below, depicts the arrangement:
For the purposes of our scenario, we love risk, so we’ll go with a single manager node.
Adding Cluster Nodes
At this point, we have a cluster with a single manager node – a cluster, albeit meagre in substance.
Before we augment the cluster with additional nodes, we need to attend to an AWS configuration detail. Docker Machine will have created an AWS security group (in the absence of our specifying the use of an existing security group), called docker-machine. It’s created with ingress configured on ports 22/tcp (for SSH) and 2376/tcp (for remote Docker client and server communication). This is insufficient for a Swarm cluster, and we need to allow ingress on ports 2377/tcp (cluster management communication), 7946/tcp and 7946/udp (intra-node communication), 4789/tcp and 4789/udp (overlay network traffic).
We can make this configuration change through the AWS console, or via the AWS command line interface. If you are operating on a local Docker host, you can use a Docker container to perform this action (parsing of the JSON returned by the AWS CLI needs to be performed by the jq command line processor):
$ docker-machine env --unset
$ alias aws='docker run -it --rm --env AWS_ACCESS_KEY_ID=<AWS Access Key ID> --env AWS_SECRET_ACCESS_KEY=<AWS Secret Access key> --env AWS_DEFAULT_REGION=<AWS Default Region> nbrown/aws-cli "$@"'
$ AWS_SGID=$(aws ec2 describe-security-groups --filter "Name=group-name,Values=docker-machine" | jq -sr '.[].SecurityGroups[].GroupId')
$ aws ec2 authorize-security-group-ingress --group-id $AWS_SGID --protocol tcp --port 2377 --source-group $AWS_SGID
$ aws ec2 authorize-security-group-ingress --group-id $AWS_SGID --protocol tcp --port 7946 --source-group $AWS_SGID
$ aws ec2 authorize-security-group-ingress --group-id $AWS_SGID --protocol udp --port 7946 --source-group $AWS_SGID
$ aws ec2 authorize-security-group-ingress --group-id $AWS_SGID --protocol tcp --port 4789 --source-group $AWS_SGID
$ aws ec2 authorize-security-group-ingress --group-id $AWS_SGID --protocol udp --port 4789 --source-group $AWS_SGID
Now that the security group is configured correctly, let’s add some worker nodes, by creating three new Docker hosts, and joining them to the cluster. First, we can use Docker Machine to create three new Docker hosts on AWS:
$ for i in {2..4}; do
> docker-machine create --driver amazonec2 --amazonec2-region eu-west-2 node-0$i
> done
Once this has completed, we should have four Docker hosts running on AWS, which we can check using the following command:
$ docker-machine ls
NAME      ACTIVE   DRIVER      STATE     URL                        SWARM   DOCKER        ERRORS
node-01   -        amazonec2   Running   tcp://52.56.227.180:2376           v17.03.1-ce
node-02   -        amazonec2   Running   tcp://52.56.236.106:2376           v17.03.1-ce
node-03   -        amazonec2   Running   tcp://52.56.239.85:2376            v17.03.1-ce
node-04   -        amazonec2   Running   tcp://52.56.234.7:2376             v17.03.1-ce
When we created the cluster using the docker swarm init command, the output from the command provided instructions for joining a worker to the cluster. The joining command, which needs to be executed on the Docker host joining the cluster, is docker swarm join. It requires a token to be passed as an argument, as well as a TCP socket, which is where a cluster manager is serving the Swarm Mode API.
When the cluster is created, two tokens are created, one for managers and one for workers. If we don’t have access to the original output from the docker swarm init command, we can query a manager node for the relevant token. To retrieve the worker token, along with details of how to join the cluster, execute the following commands:
$ eval $(docker-machine env node-01)
$ docker swarm join-token worker
To add a worker to this swarm, run the following command:

    docker swarm join \
    --token SWMTKN-1-5rgvodnnugqbfiuzhvcpnb30x58zwo6oh3oefd8tbcb40lp1o7-df8tr59zzv4ocyumb31m3fezt \
    172.31.13.238:2377
Having pointed our local Docker client to node-02, we can issue the docker swarm join command to join the node to the cluster:
$ eval $(docker-machine env node-02)
$ docker swarm join --token SWMTKN-1-5rgvodnnugqbfiuzhvcpnb30x58zwo6oh3oefd8tbcb40lp1o7-df8tr59zzv4ocyumb31m3fezt 172.31.13.238:2377
This node joined a swarm as a worker.
So, what’s the purpose of the token? The token comprises of two parts seperated by a -; a hash of the certificate associated with the Certificate Authority used by the cluster to establish mutual TLS connections between cluster nodes, and a cluster unique secret for the relevant node role, i.e. worker or manager. When a node seeks to join the cluster, it requests the CA certificate from the manager, and checks the certificate by comparing the hash of the received certificate with the hash contained in the token. The role secret is used to authorise the joining node as a worker or manager, depending on the content of the secret, by way of the manager issuing a certificate containing a unique cluster ID for the joining node, as well as a definition of its permitted role.
The steps above can be repeated for node-03 and node-04 in order to add them to the cluster as workers.
Cluster Information
In order to obtain an overview of the cluster we’ve established, the Docker CLI provides the docker node ls command, which must be executed on a manager node:
$ eval $(docker-machine env node-01)
$ docker node ls
ID                           HOSTNAME  STATUS  AVAILABILITY  MANAGER STATUS
0p5m9fyochy68dtyimiie2x9v    node-03   Ready   Active
52luz2juwugh6zwvn1y8ti7fp    node-04   Ready   Active
doow8fsw5aoxy2a39l47nztln *  node-01   Ready   Active        Leader
pyj3vaejnmxifx6pbjpun67ig    node-02   Ready   Active
This output summarises the overall cluster status, by listing each node by its cryptographic ID and hostname, and providing its state, availability for scheduling purposes, and its managerial status (if it’s a manager). Our cluster has one manager, and three healthy workers.
Changing Node Roles
Let’s assume for a moment, that we have become more adverse to risk, and want our cluster to be more resilient to failure. We decide to promote node-02 and node-03 to join node-01 as managers. To do this, we can execute the docker node promote command on an existing manager:
$ docker node promote node-02
Node node-02 promoted to a manager in the swarm.
We can now promote node-03 using either of the two current managers:
$ eval $(docker-machine env node-02)
$ docker node promote node-03
Node node-03 promoted to a manager in the swarm.
Getting an updated status of the cluster, now shows that node-02 and node-03 are ‘reachable’ as managers in the cluster:
$ docker node ls
ID                           HOSTNAME  STATUS  AVAILABILITY  MANAGER STATUS
0p5m9fyochy68dtyimiie2x9v    node-03   Ready   Active        Reachable
52luz2juwugh6zwvn1y8ti7fp    node-04   Ready   Active
doow8fsw5aoxy2a39l47nztln    node-01   Ready   Active        Leader
pyj3vaejnmxifx6pbjpun67ig *  node-02   Ready   Active        Reachable
We can use the docker node demote command to return our promoted nodes back to worker nodes:
$ eval $(docker-machine env node-01)
$ docker node demote node-02 node-03
Manager node-02 demoted in the swarm.
Manager node-03 demoted in the swarm.
Workload Abstraction
On a single Docker host, workloads are generally deployed as discrete containers, using the docker run command. In a cluster of Docker hosts, however, working at the container level of abstraction is not efficient. We would quickly become overwhelmed if we tried to manage every individual container, particularity if we needed to scale individual services.
For that reason, when deploying workloads on a Swarm cluster, we work with a ‘service’ abstraction. A service is based on a specific Docker image, and is comprised of one or more identical tasks, which are the atomic unit for scheduling purposes, and are implemented as individual containers.
Sometimes, it’s more convenient to conceive our application as a set of multiple services, interacting as consumers and providers. Swarm allows us to define and operate such a set of services as a ‘stack’. This is a further level of abstraction, which we’ll cover in a later tutorial in this series. For now, we’ll focus on services.
Deploying a Service
A service shares a number of the characteristics associated with a container, but as we learned above, is abstract in nature. A service is created using the docker service create command, which takes the following form:
docker service create [OPTIONS] IMAGE [COMMAND] [ARGS]
The tasks that constitute an implementation of a service are governed by the Docker image specified at service creation time, but can be nuanced with the options and command and/or arg parameters.
In order to deploy a service based on the official Nginx Docker image, we would issue the following command against a manager node:
$ docker service create --name nginx nginx
u4ijzs9jcy95siwx9hqxm1y4g
The service is created with the name nginx, and the ID of the service is returned. We can get information about the service using the docker service ls command:
$ docker service ls
ID            NAME   MODE        REPLICAS  IMAGE
u4ijzs9jcy95  nginx  replicated  1/1       nginx:latest
The output indicates that we have just one replica instance or task for our service, but which node in the cluster is it running on? The docker service ps command enables us to find out:
$ docker service ps nginx
ID            NAME     IMAGE         NODE     DESIRED STATE  CURRENT STATE          ERROR  PORTS
xshq98oje1jb  nginx.1  nginx:latest  node-01  Running        Running 5 seconds ago
This provides us with a list of the tasks associated with the service, and our single task was scheduled to run on node-01, our manager node. In a future article in this series, we’ll learn how to exclude scheduling on manager nodes.
In order to scale our Nginx service, all we have to do is issue a docker service scale command against a manager node. Let’s assume we wanted to scale the Nginx service to eight replicas, and watch as these replicas are deployed across our cluster:
$ docker service scale nginx=8 > /dev/null; watch -n 1 docker service ps nginx
ID            NAME     IMAGE         NODE     DESIRED STATE  CURRENT STATE                     ERROR  PORTS
xshq98oje1jb  nginx.1  nginx:latest  node-01  Running        Running 4 minutes ago
uv99cbvwvea4  nginx.2  nginx:latest  node-03  Running        Preparing less than a second ago
kps4s189agfh  nginx.3  nginx:latest  node-04  Running        Preparing less than a second ago
zap2s6m9f7ut  nginx.4  nginx:latest  node-03  Running        Preparing less than a second ago
xz9u2loml3j9  nginx.5  nginx:latest  node-02  Running        Running less than a second ago
uwwnsjr8zp68  nginx.6  nginx:latest  node-02  Running        Running less than a second ago
1toyo5ojsqy0  nginx.7  nginx:latest  node-01  Running        Running less than a second ago
7vj3lckjz9it  nginx.8  nginx:latest  node-04  Running        Preparing less than a second ago
The output of the watch command will show how Swarm’s scheduler invokes tasks on the cluster’s nodes, changing the ‘current state’ of each task from assigned (to a cluster node), to preparing (whilst the Docker image is retrieved from a registry), to running (as a container on the assigned node). Eventually, the service will comprise of eight tasks, two running on each of the four nodes. The scheduler uses a ‘spread’ strategy for evenly distributing the tasks across the nodes in the cluster.
When we’ve finished with the service, we can remove it, along with its associated tasks, using docker service rm:
$ docker service rm nginx
nginx
Conclusion
This tutorial has outlined some of the features associated with Docker’s native orchestration capability, Swarm. In particular, we’ve seen how to bootstrap a swarm mode cluster in the cloud using Docker Machine, manage the cluster nodes and their roles, as well as deploy and scale a simple service on the cluster. In the next tutorial, we’ll take a more in-depth view of scheduling services.
If you have any questions and comments, feel free to leave them in the section below.
Want to continuously deliver your applications made with Docker? Check out Semaphore’s Docker platform with full layer caching for tagged Docker images.
Read next:
- Sign up to receive a free ebook guide to CI/CD with Kubernetes
- Lightweight Docker Images in 5 Steps
- Continuous Deployment with Google Container Engine and Kubernetes
- Creating a Heroku-like Deployment Solution with Docker
Want to discuss this article? Join our Discord.